 Copyright Infinitybox, LLC 2021. All Rights Reserved.
 Automatic Headlights
We get a lot of questions about adding advanced features to our Infinitybox system. The reality of our system is that it is very easy to add modern functions to your car Here’s another great example.
A lot of customers want to add automatic headlights to their car. Some people call this a twilight function and practically every new car can do this. When it gets dark outside, the headlights turn on automatically.
To do this, you can use practically any light sensor. It just needs to make a connection when the light level gets dark. You are going to use this connection to ground the MASTERCELL input for the headlights. Remember that the MASTERCELL triggers an output on a POWERCELL when the input wire is grounded.
You can find simple photosensor relay modules on-line. Amazon has a lot of options. Try searching for “Photosensor Sensor Relay Module”.
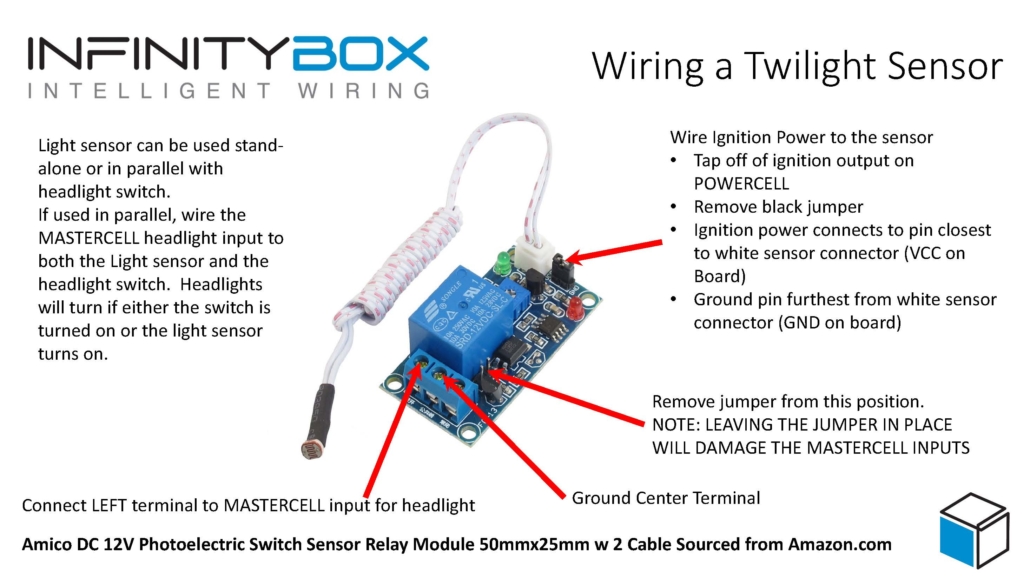
The photoelectric switch simply needs power and ground. You should tap off of the ignition output on your POWERCELL to provide 12-volts to the switch. You can ground it locally in the car. The power and ground terminals are located on the side of the switch close to the white sensor connector. The power terminal is closest to the white connector and it is labeled VCC on the board. The ground terminal is on the side away from the white connector and it is labeled GND on the board.
On the other side of the board is a blue connector. The center terminal of this connector will connect to ground. You can connect this locally to ground or you can use one of the black ground wires in the MASTERCELL harness. There is a black jumper that may be located on a set of pins next to the relay on the board. See the picture below for more details. It is very important that this jumper be removed from the pins. You can do this with your fingernail or a small pair of needle-nose pliers. This jumper selects between ground switching the outputs on the relay or applying 12-volts from the relay. The MASTERCELL inputs are designed to be ground switched and they can be damaged if voltage is applied to them. You must make sure that you remove this jumper from the pins on the board.
Once you have the jumper removed, connect your MASTERCELL input to the left terminal next to the relay. See the diagram below for more details.
Lastly, take the white sensor cable and mount it in a place in the car where ambient light will hit it. You may have to experiment with the location of this sensor. There is also a potentiometer on the board that you can use to adjust the sensitivity of the sensor. Essentially, you need to adjust its location and the potentiometer so that the relay turns on when the ambient light falls below the threshold that you want.
You can have this light sensor as your only way to turn on your headlights. To do this, simply run the headlight input to the MASTERCELL directly to the light switch. You can also have it so that either the light sensor or the headlight switch will turn on your lights. To do this, wire the MASTERCELL input to both the headlight switch and the light sensor. You can split the MASTERCELL input into two runs, one for the headlight switch and one for the light sensor.

Image of a wiring diagram showing how to wire a simple photosensor relay to a MASTERCELL input
This diagram is just an example of one photosensor relay board that we found on Amazon. Follow the instructions that came with the photosensor that you are going to use.
You can download a simple diagram from our website that shows you all of the details. This link will take you there.
Please give our technical support team a call if you have questions about wiring your twilight lights with this sensor. You can click on this link to contact our team directly.


 Copyright Infinitybox, LLC 2021. All Rights Reserved.
  Copyright Infinitybox, LLC 2021. All Rights Reserved.
  Copyright Infinitybox, LLC 2021. All Rights Reserved.
Leave a Reply
Want to join the discussion?Feel free to contribute!