
How to Wire the Holley Sniper EFI with the Infinitybox IPM1 Kit
Until recently, electronic fuel injection was completely out of the hands of your typical automotive enthusiast. Over the past years, many different companies have introduced powerful and elegant systems to bring the benefits of EFI to anyone. Holley’s Sniper EFI system is one of the most popular. It is a cost-effective throttle body EFI system that can handle up to 650 horsepower and can be tuned without a laptop. Wiring the Holley Sniper EFI system is a breeze with our Infinitybox Intelligent Power Management Kit, the IPM1. This blog post will take you through the details.
Note: This post covers wiring the Holley Sniper EFI with our current IPM1 Kit and the MASTERCELL NGX. If you are wiring the Sniper with our Legacy 20-Circuit Kit, click here to see our original Holley Sniper EFI wiring guide.
Table of Contents
- What Changed: IPM1 Kit vs. the Legacy 20-Circuit Kit
- Wiring the Holley Sniper EFI System with your Infinitybox IPM1 Kit
- Summary
What Changed: IPM1 Kit vs. the Legacy 20-Circuit Kit
If you are familiar with our earlier blog posts, you may have seen our original guide for wiring the Holley Sniper EFI with our Legacy 20-Circuit Kit. We have replaced that kit with the IPM1 Kit, which includes our new MASTERCELL NGX. There are some important differences that simplify how you wire the Sniper EFI.
The biggest change is that the MASTERCELL NGX has both ground-switched and high-side switched inputs. Our Legacy 20-Circuit Kit only had ground-switched inputs on the MASTERCELL. If a trigger from an aftermarket system like the Sniper sent a 12-volt signal, you had to install an inVERT Mini inline to flip that signal to a ground trigger. With the MASTERCELL NGX, high-side switched inputs are built in. The fuel pump trigger from the Sniper EFI is a 12-volt signal. You can now connect it directly to a high-side input on the MASTERCELL NGX without needing an inVERT Mini. This saves you a component and simplifies your wiring.
The MASTERCELL NGX also includes dedicated low-current indicator outputs that can directly drive dash indicators like your turn signal indicators, high-beam indicator, and gauge illumination. On top of that, the MASTERCELL NGX is fully programmable and configurable by the customer.
Wiring the Holley Sniper EFI System with your Infinitybox IPM1 Kit
Our Infinitybox system can interface with any electronic fuel injection system on the market. Wiring the Holley Sniper EFI is as simple as wiring their Terminator or their Dominator. Click on this link to get to the details of wiring the Holley Terminator. Click on this link to get to the details of wiring the Holley Dominator.
Before you start wiring the Holley Sniper EFI, you must thoroughly read and understand the instructions that came with your kit. This link will take you to the Holley manual. Note that this blog post is just going to cover wiring ignition power from your Infinitybox system and wiring the fuel pump and cooling fan. The Holley manual will cover the rest of the wiring details.
This diagram shows you the connections between your Holley Sniper EFI and your Infinitybox IPM1 Kit with the MASTERCELL NGX.
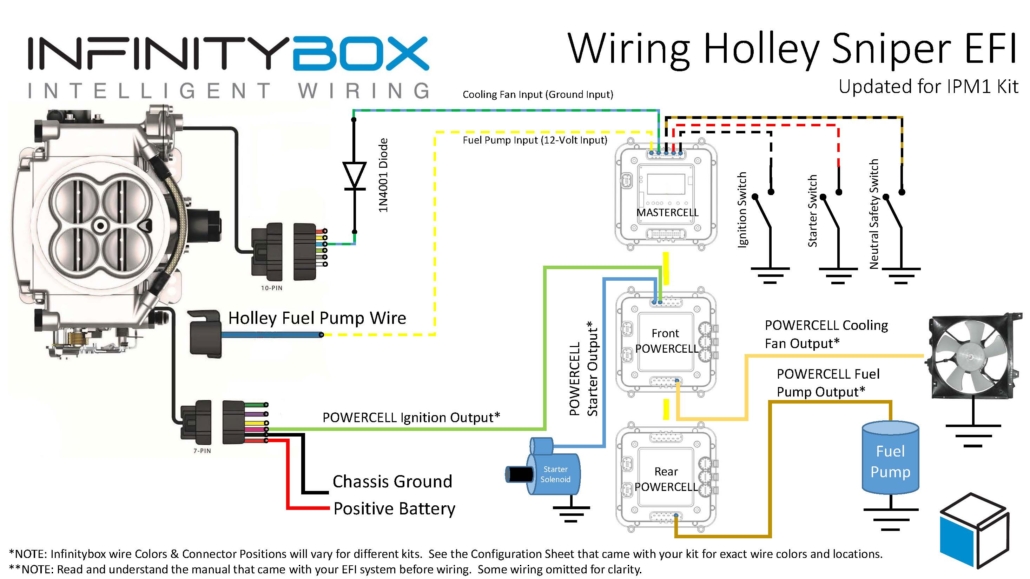
Wiring diagram showing the connections between the Holley Sniper EFI and the Infinitybox IPM1 Kit with the MASTERCELL NGX, including the fuel pump trigger on a high-side input and the cooling fan trigger with a 1N4001 isolation diode.
Battery Power and Ground
First things first, you need to get battery power and ground to the Sniper. The red wire in their 7-pin connector must go directly to the positive terminal on your battery. The black wire in their 7-pin connector must go to ground. As we discuss in other blog posts, 90% of all electrical problems relate to a bad ground. Make sure that you have a solid metal-to-metal connection to your chassis with no paint, grease, powder coating, or dirt in the way.
Ignition Power to the Sniper EFI
Next, you need to bring ignition power from your POWERCELL to the pink wire on their 7-pin harness. In most Infinitybox systems, this is the light-green wire on your front POWERCELL but check your configuration to be sure. This POWERCELL output will supply battery power to the Sniper whenever you have the ignition switch on.
Wiring the Cooling Fan Trigger from the Holley Sniper EFI
Next, you need to connect the MASTERCELL NGX input for your cooling fan to the light-blue wire on the Sniper 10-pin harness. The cooling fan trigger from the Sniper is a ground-switched output. Even though the MASTERCELL NGX accepts ground-switched inputs directly, we always recommend isolating any ground-switched input from an external system like the Sniper EFI. The reason is that we do not know what the Sniper does with its trigger when it is off. It may let the trigger float or pull it up to battery voltage. Either of these conditions could cause erratic behavior on the MASTERCELL NGX input.
To isolate the input, you must install a 1N4001 diode in series between the MASTERCELL NGX input and the cooling fan trigger on the Holley harness. Install the diode with the anode facing the MASTERCELL NGX. Note that the orientation of this diode is critical. Check the diagram above for the correct orientation of the stripe on the diode.
There are several advantages to using the Infinitybox system to control the cooling fan directly off of the Sniper harness. First, you do not need to add a relay. That is built into the POWERCELL. Second, our cooling fan outputs are set to soft-start the motor. Click here to learn more about the benefits of soft-starting.
Wiring the Fuel Pump Trigger from the Holley Sniper EFI
Next, it is time to wire the fuel pump. The dark-blue wire on the 7-pin connector is the fuel pump trigger. This is a 12-volt signal from the Sniper. With the MASTERCELL NGX in your IPM1 Kit, you can connect this fuel pump trigger directly to one of the high-side switched inputs on the MASTERCELL NGX. There is no need for an inVERT Mini. The MASTERCELL NGX has the equivalent of that circuit built into its high-side inputs. This is one of the key improvements over the Legacy 20-Circuit Kit, which required an inVERT Mini inline to convert this 12-volt trigger to a ground signal.
The diagram above shows you how to connect the dark-blue fuel pump trigger wire from the Sniper directly to the high-side input on the MASTERCELL NGX.
There are several advantages to using the Infinitybox system to control the fuel pump directly from the Sniper harness. First, we can disable the fuel pump as a security measure if you have our inLINK Radio upgrade. More importantly, having the Infinitybox system control the fuel pump means that you have to run less wire in the car. The MASTERCELL NGX is located close to the EFI system. The rear POWERCELL is mounted near the fuel pump in the tank. There is no extra fuel pump wiring required to make it work.
Summary
Wiring the Holley Sniper EFI system with your Infinitybox IPM1 Kit and the MASTERCELL NGX is straightforward. The high-side switched inputs on the MASTERCELL NGX eliminate the need for an inVERT Mini on the fuel pump trigger, which simplifies your wiring. Remember to isolate the ground-switched cooling fan trigger with a 1N4001 diode to protect the MASTERCELL NGX input.
You can download a PDF of our wiring diagram by clicking this link.