
Door Poppers with the Lokar 12-Volt Door Switches
How to Wire Lokar 12-Volt Door Handles to Infinitybox Systems for Door Poppers
Wondering how to connect Lokar 12-volt door handles to your Infinitybox system? This comprehensive guide shows you how to wire Lokar billet door handles with door popper solenoids using both the Legacy 20-Circuit Kit and the new inMOTION NGX system.
Understanding Lokar 12-Volt Billet Door Handles
Lokar manufactures premium billet accessories for custom cars and trucks. Their Billet Exterior 12-Volt Door Handles combine classic styling with modern functionality, featuring an integrated switch that activates door popper solenoids when you pull the handle. These bolt-on handles provide a sleek, modern touch to any vehicle’s exterior doors.
Learn more about Lokar Billet Exterior 12-Volt Door Handles
Wiring Lokar Door Handles with the Legacy 20-Circuit Infinitybox System
The Legacy Infinitybox system makes it simple to integrate Lokar door handles with electric door poppers. Follow these step-by-step instructions:
Installation Steps
1. Install the Hardware
- Mount the Lokar door handles according to manufacturer instructions
- Install door popper solenoids in each door per the included guidelines
2. Connect POWERCELL Outputs
- Select OPEN outputs on your POWERCELL module for each door
- Connect the POWERCELL output wire to one lead on the door popper solenoid
- Ground the other solenoid lead
3. Wire MASTERCELL Inputs
- Connect the MASTERCELL input (corresponding to your OPEN output) to the switch inside the Lokar door handle
- Ground the remaining switch wire
How It Works
When you pull the Lokar door handle, the MASTERCELL input grounds out. This triggers the MASTERCELL to command the POWERCELL to activate the output, pulsing the door popper solenoid and releasing the door latch.
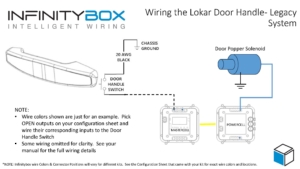
Picture of Wiring diagram showing how to wire the Lokar 12-volt Door Handle to the Legacy Infinitybox System to control door poppers.
Bonus Security Feature: We can program your system to block door popper switches when security is enabled via inLINK or inTOUCH NET. This ensures doors only open when you disable security using your inLINK key fob or smartphone app.
Wiring Lokar Door Handles with inMOTION NGX System
The Next Generation inMOTION NGX simplifies the installation even further. This door-mounted control module features two H-Bridge relays designed for power locks and power windows.
Simplified NGX Installation
The inMOTION NGX installs directly inside your door, keeping all wiring localized:
- Use one output from the power lock relay pair to control the door popper solenoid
- Wire the Lokar door handle switch directly to the inMOTION NGX in the same door
- Control both the switch input and popper output from a single module
This configuration dramatically reduces wiring complexity compared to traditional systems.

Picture of wiring diagram showing how to wire the Locar 12-Volt Door Handles to control door poppers using the Infinitybox inMOTION NGX door control module.
The inMOTION NGX also supports security integration, allowing you to configure door poppers to function only when the vehicle security system is disarmed.
Download Wiring Diagrams
Need Help with Your Infinitybox Installation?
Our team is ready to answer your questions about connecting Lokar door handles or any other Infinitybox wiring project. Contact us at (847) 232-1991 or click here to reach our support team.
Keywords: Lokar 12-volt door handles, Infinitybox wiring, door popper solenoid, inMOTION NGX, Legacy 20-Circuit Kit, billet door handles, electric door poppers, POWERCELL, MASTERCELL, custom car wiring

 Copyright Infinitybox 2022. All Rights Reserved.
  Copyright Infinitybox, LLC 2021. All Rights Reserved.
  Copyright Infinitybox, LLC 2021. All Rights Reserved.
  Copyright Infinitybox, LLC 2021. All Rights Reserved.
  Copyright Infinitybox, LLC 2021. All Rights Reserved.
  Copyright 2022 Infinitybox, LLC. All Rights Reserved.

Leave a Reply
Want to join the discussion?Feel free to contribute!