Splice Saver Kit
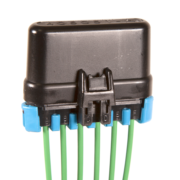
There are lots of different places in your car’s harness where you need to take a single POWERCELL output and splice it to go to different outputs. Our new Infinitybox Splice Saver Kit gives you a very easy way to create a robust and reliable junction point in your wiring harness. The Infinitybox Splice Saver Kit gives you an easy way to connect multiple accessories to a single POWERCELL output. Examples include powering your ECU, gauge power, stereo power and A/C power from a single ignition output. Other examples include lighting, locks and stereo power. You can power 5 separate wires from a single input wire. The internal buss bar can be split to create two separate circuits, each with a single input and two outputs. We also include 3 cavity plugs to seal any unused outputs.
The Splice Saver uses the same sealed 280 Metripack terminals and cable seals that are used in the POWERCELL and inMOTION output harnesses. The kit includes all the components needed to build a sealed junction point for your wiring harness. It also includes a mounting clip for a clean install in your harness.
Here’s what you get with the Splice Saver Kit:
(1) 6-Position Splice Saver Connector
(1) Splice Saver Sealed Cover
(1) 6-Position Terminal Position Assurance (TPA) Clip
(1) 6-Position Buss Bar
(1) Mounting Clip
(6) 280 Metripack Terminals
(6) 280 Metripack Cable Seals
(3) 280 Metripack Cavity Plugs
You can download the instructions for the Splice Saver Kit by clicking this link.
Just like any other job on your car, you need the right tool for the job. We recommend using the correct crimp tool to properly install the terminals on the end of the wires that are going into your Splice Saver Kit.
This tool can be purchased from Waytek wire by clicking this link.
We put together a few good examples of how the Splice Saver Kit can help you simplify the splices that you need to make in your cars wiring harness.
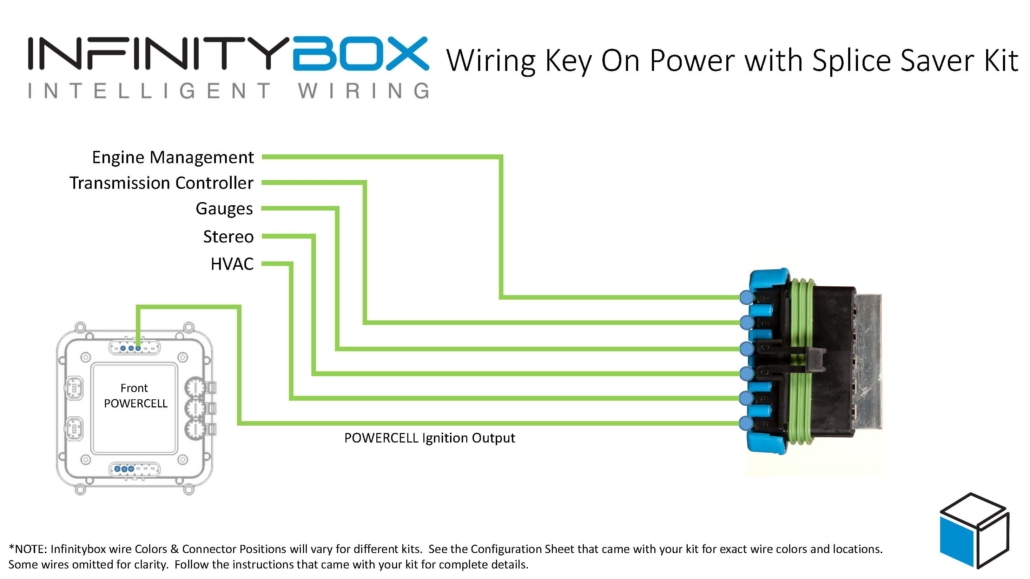
The first example is wiring your Ignition power. The Ignition output on your POWERCELL is going to power everything that needs key-on power in your car. Primarily, this is going to power your coil, ignition box or ECU. You may also need key-on power for things like your radio, heating & air-conditioning system, gauges and transmission controller. The splice saver will take in your Ignition output and distribute it to these multiple electrical systems. Check out this picture to see how you can use the Splice Saver to simplify your Ignition wiring. You can down load this diagram as a PDF by clicking this link.
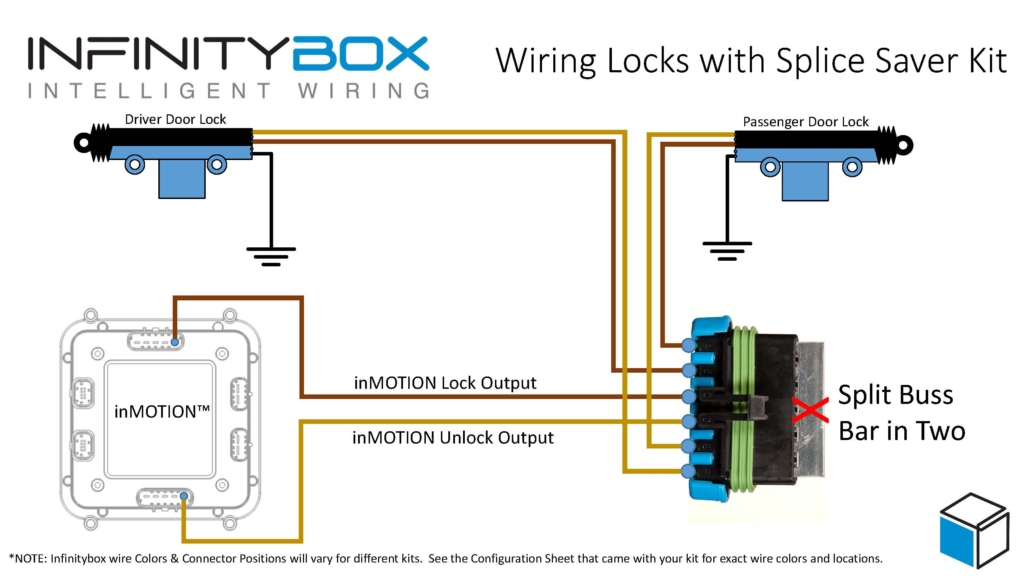
Wiring door locks is another great example of where the Splice Saver Kit can help clean up your wiring. You have one set of outputs on your inMOTION cell that need to go to the door lock actuators on the driver and passenger side of your car. You can split the buss bar of your Splice Saver Kit in half, which gives you two separate circuits for the lock and unlock outputs on inMOTION. This picture shows the details. You can download this diagram as a PDF by clicking this link.
Wiring the front parking lights in your car is another great place to use a Splice Saver Kit. You first need to take the POWERCELL output for the parking lights and split that to go to the lights on the left & right side of the car. You also need to tap into this parking light output to get power for your gauge illumination and for any other accent or trim lights you may have in your car. This picture shows how you can easily do this. You can download this diagram as a PDF by clicking this link.

Wire diagram showing how to wire front parking lights and illumination with the Infinitybox Splice Saver Kit
You can do something similar for your high beam wiring. You need to first get the output from your front POWERCELL split to go to the left and right high beam bulbs. You also need to tap into this circuit to power the high beam indicator on your dash. A Splice Saver Kit can make this very easy. Wiring the high beam bulbs and the indicator on the dash doesn’t use all of the outputs on the Splice Saver Kit. We include cavity plugs that you can use to seal the open circuits to keep water, dust and dirt out. Check out this picture for more details. You can download this diagram as a PDF by clicking this link.

Wiring diagram showing how to wire high-beams and dash indicator with the Infinitybox Splice Saver Kit
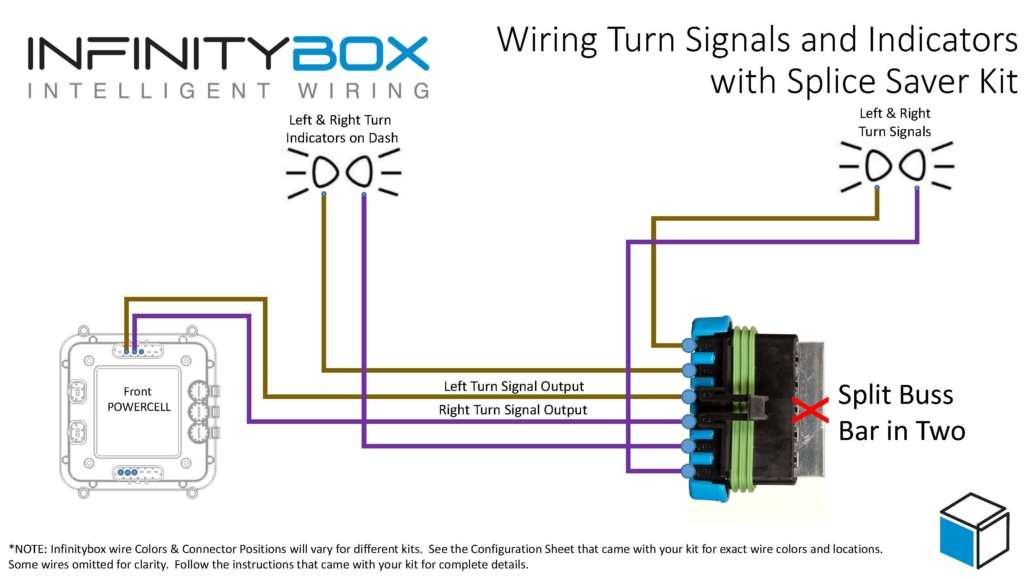
The wiring for your turn signals in the front of the car is another great place for a Splice Saver Kit. Just like the door locks, you can split the buss bar on the Splice Saver to get two separate circuits. These two circuits can be used to easily get you access to the connections you need to get your turn signal indicators on your dash. This picture shows you the details. You can download this diagram as a PDF by clicking this link.
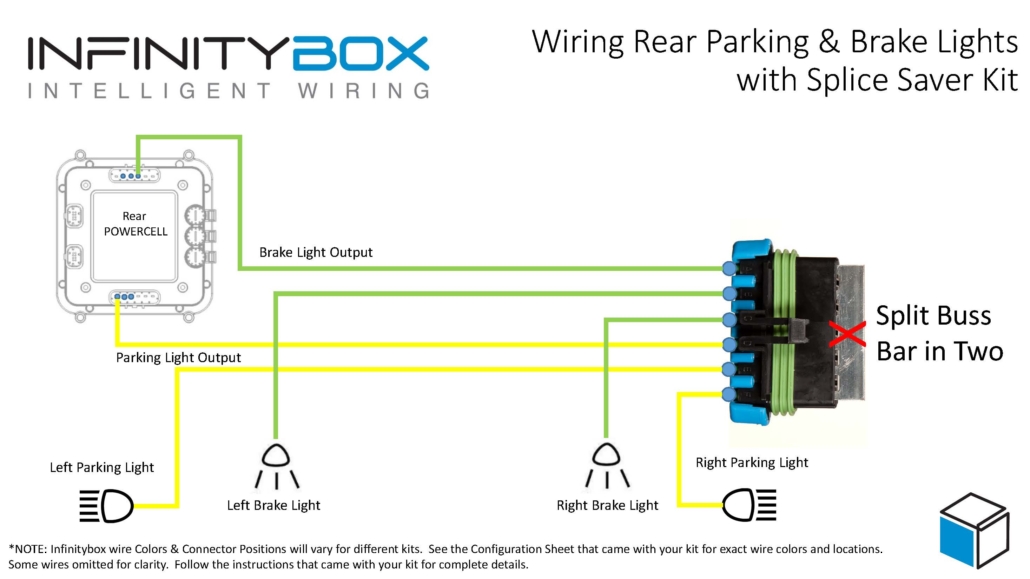
Your rear parking lights and brake lights wiring are another good example. You can split the buss bar to get two separate circuits. Then you can use the Splice Saver Kit to connect the POWERCELL outputs for the rear parking lights and brake lights to the bulbs on the left and right side of the car. This picture shows the details. You can download this diagram as a PDF by clicking this link.
You can order the Splice Saver Kit by clicking this link.
Click here to get in touch with our technical support team with any questions.

 Copyright Infinitybox, LLC 2021. All Rights Reserved.