Posts

Programming with the Microchip PICKit 4

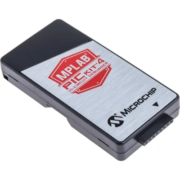
You can use the Microchip PICKit 4 In-Circuit Debugger to load code onto your Infintybox MASTERCELL, POWERCELL and inMOTION cell.  This is an advanced feature and you would only need to do this when instructed by the Infinitybox team.  There is a special programming harness required.  Contact Infinitybox technical support for more details.  Please follow these instructions to update your cell with the PICKit 4.

1.  You will receive a file to load onto your cell. Save this file to the desktop of your computer.

2.  Download Microchip’s MPLAB X IDE software.  Click this link to get the latest version of their software.  Follow the instructions from Microchip to install the software suite. Once the software is installed, reboot the computer.

3.  Plug the PICKit 4 into your computer and let Windows install the drivers. Once the drivers are installed, reboot the computer.

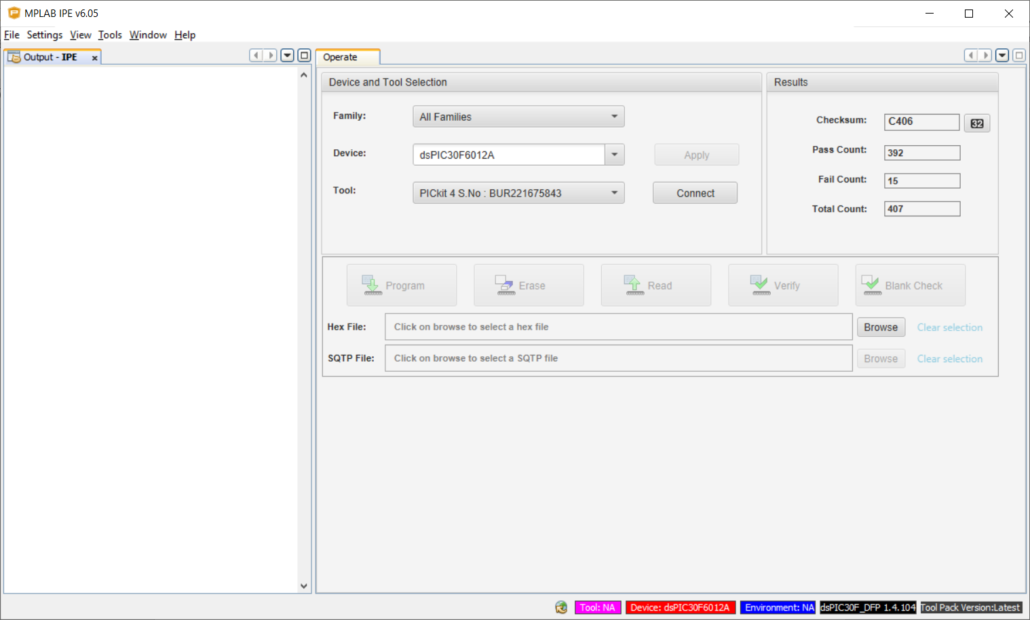
4.  Click on your computer’s Start button and go to the Microchip folder under Programs. Launch MPLAB IPE.  The application will look like this.
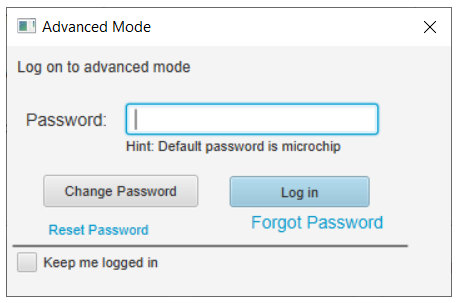
5. Click on the Settings option in the top bar and select Advanced Mode.  This will bring up a dialogue box asking for a password.  The default password is “microchip”.  Type this into the Password field and click on the Log In button.  The dialogue box will look like this.
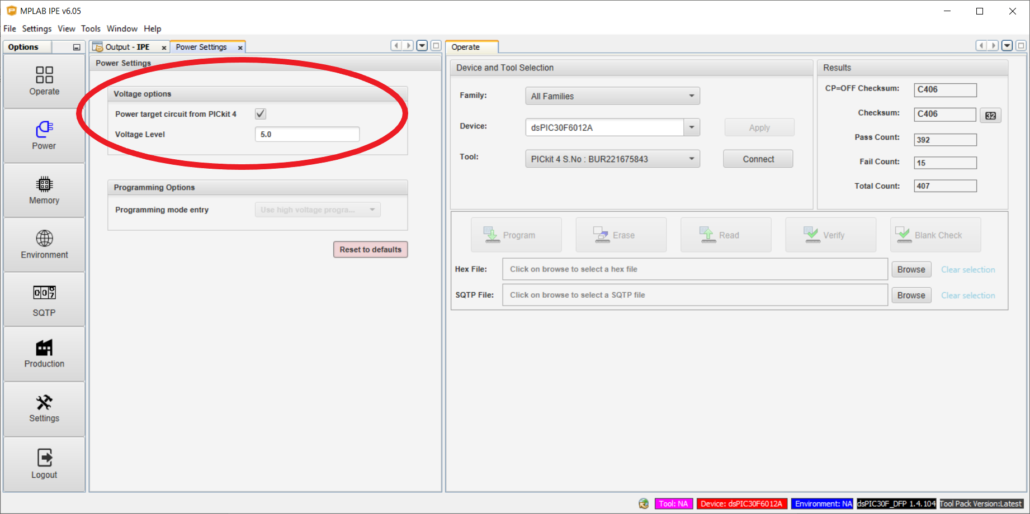
6. The advanced options buttons will appear on the left of your screen.  Click on the Power button.  This will open a tab with the Power Settings.  Click on the box next to “Power target circuit from PICKit 4”.  A check should appear in the box as shown in this picture.  Make sure that the value in the Voltage Level field is 5.0.
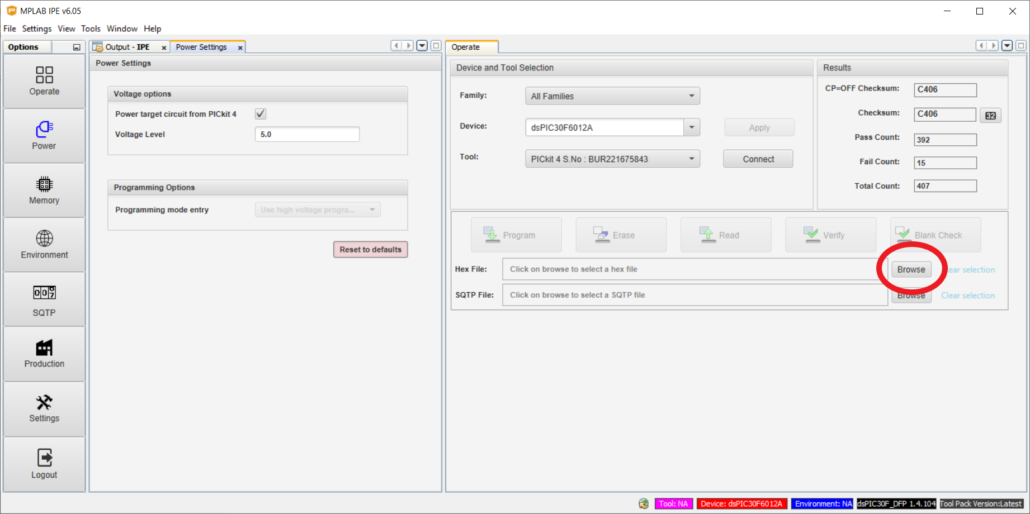
7. Click on the Browse button under the Operate tab as shown in the image below.  This will open a dialogue box.  Use this box to browse to your desktop to select the file that we emailed you.  Select this file and click the Open button.  You will get a message in the Output IPE tab that will read Hex File Loaded Successfully.
8. Confirm that the Device and Tool are correct.  These values are on the Operate tab.  The Device should be dsPIC30F6012A.  The Tool should be PICKit 4.  The following picture shows where these values are located.
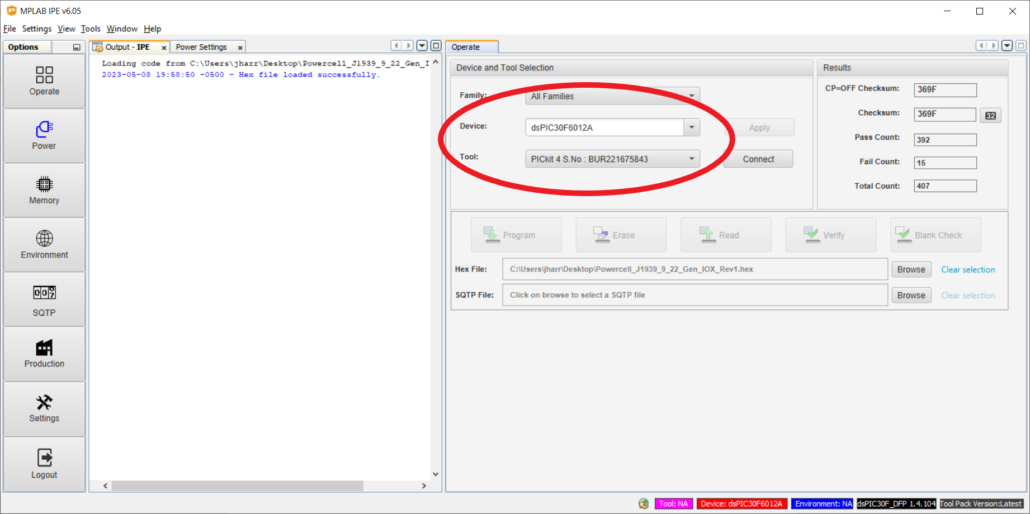
9. Plug the black connector on the PICKit 4 harness into the programming port on the cell to be programmed.

10. Click on the Connect button under the Operate tab.  The following picture shows this button.
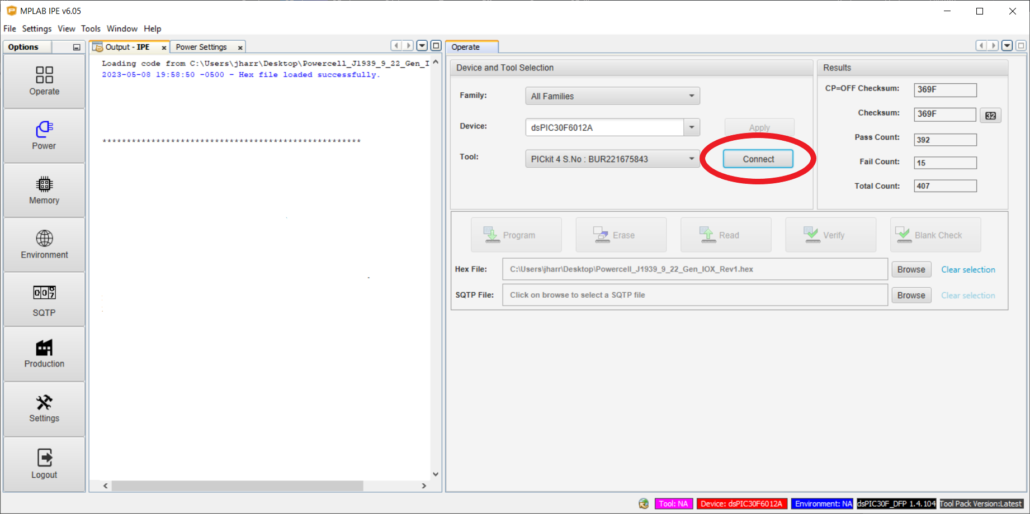
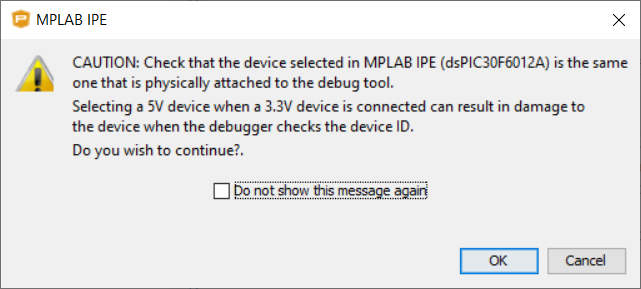
A warning box will appear, as shown below.  Click on the OK button to accept this warning.
11. Click on the Program button as shown in the picture below.  The PICKit 4 will load the hex file into the process of the cell being programmed.  This will take 20 to 30 seconds to complete.  You will get a message in blue in the Output IPE tab that will say Programming Complete.
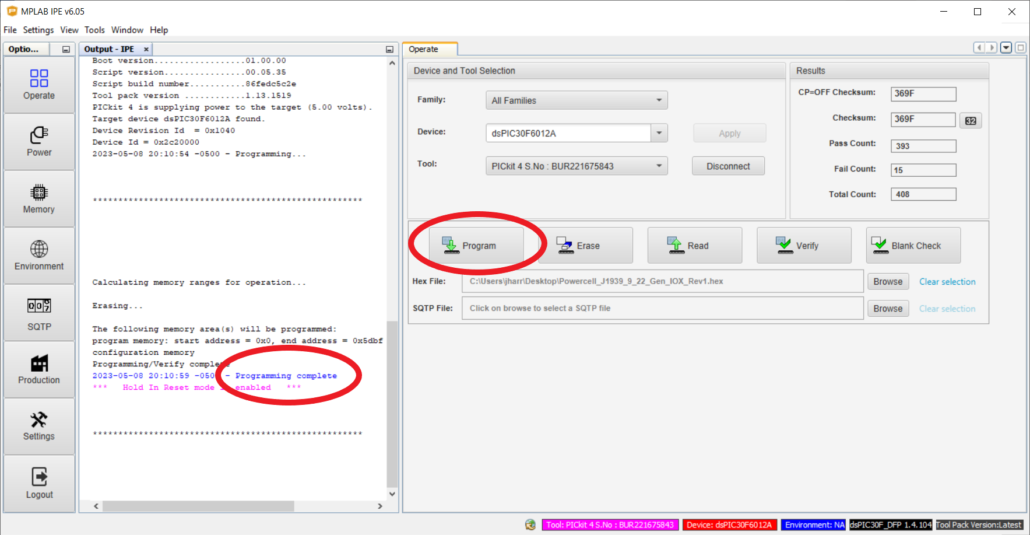
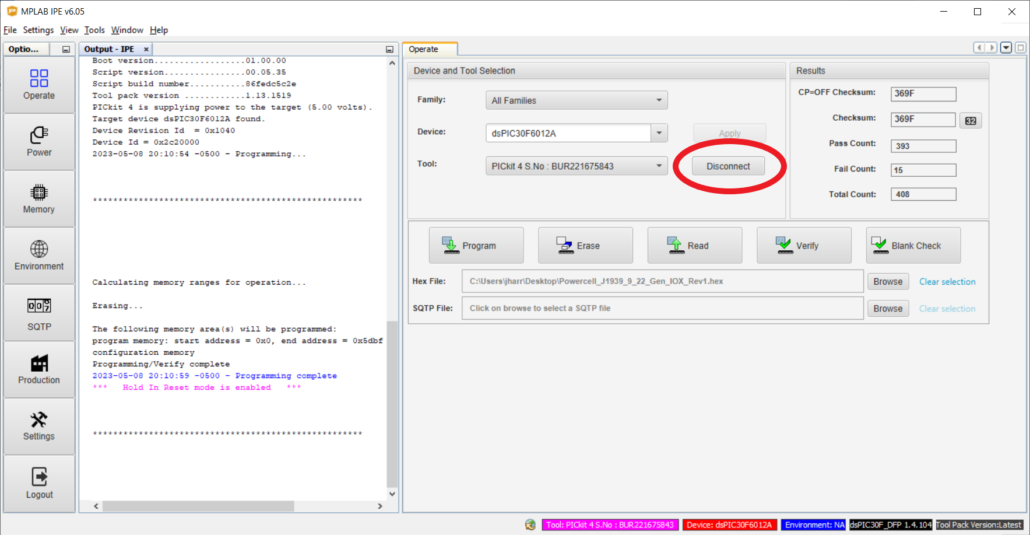
12. Click on the Disconnect button as shown in the picture below and unplug the PICKit 4 from the cell being programmed.


Updating inTOUCH MAX Screen

This blog post will walk you through the steps to update the screens and code on an Infinitybox inTOUCH MAX Screen.

Please note that these instructions are for the legacy inTOUCH MAX screens that were manufactured through 2013.  If you have an inTOUCH NET smart device interface, this does not relate to you.  Unless specifically directed by a technical support representative from Infinitybox, you do not need to do this.  You can stop reading here.  

Here are the instructions.

  1. You will need an SD card that is a maximum size of 2GB (a smaller card will work fine).  It must be formatted as FAT16 (or just FAT) not FAT32 on a PC not a Mac.  You can find a video showing how to do this by clicking this link.
  2. You will receive an email from Infinitybox technical support that will have the files needed to be loaded onto the SD card.  Save these files to the SD card.  Do not put these in a folder on the SD card.
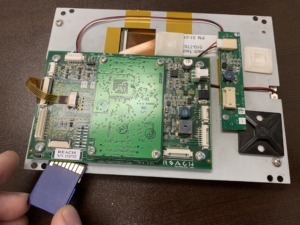
  3. Power down the touch screen and the complete Infinitybox system.  Insert the SD card into the slot on the screen. The SD card slot is located on the opposite side of the circuit board where the REACH serial number sticker is.  This picture will show you where the SD card slot is and the proper orientation of the card.

    Location of the SD Card Slot on the Infinitybox inTOUCH MAX Screen

    Location of the SD Card Slot on the Infinitybox inTOUCH MAX Screen

  4. Power up the system, the screen should be blank and the green LED labeled D1 on the back of the screen should be lit and the LED labeled D2 should be flashing rapidly. After about 30 seconds, the D2 LED will stop flashing and the screen back light will turn on.
  5. The screen is now reprogrammed, remove power from the screen and remove the SD card.

Please contact Infinitybox technical support with additional questions.

Updating inTOUCH NET

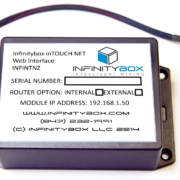
Our inTOUCH NET product completely changed the way that our customers interact with their vehicles and the Infinitybox system.  They have a universal interface that is fast, responsive and flexible plus it doesn’t require any custom apps.  Their vehicle can be controlled from Apple, Android and Windows smart devices with ease.

Just like the rest of the Infinitybox hardware, inTOUCH NET can be updated in the field using code that we create for you.  Give our technical support team a call with the changes that you need for your inTOUCH NET and we will email you the files necessary to implement the changes.

PLEASE NOTE: YOU WILL ONLY HAVE TO GO THROUGH THESE STEPS IF YOU ARE DIRECTED TO DO SO BY AN INFINITYBOX TECHNICAL SUPPORT REPRESENTATIVE!

inTOUCH NET uses very sophisticated micro-controllers to do its job.  This process sounds complicated but it is easier than it seems.

Here are the steps that you need to follow to update your inTOUCH NET system.

  1. You will receive an email from Infinitybox technical support with the updated files that are specific to your inTOUCH NET.  Download these files and save them to a convenient location on your computer.
  2. Disconnect inTOUCH NET from your Infinitybox system.
  3. Download and install  http://ww1.microchip.com/downloads/en/DeviceDoc/MPLAB_IDE_8_92.zip on your computer.
  4. After it is successfully installed, reboot your computer.
  5. After the computer is rebooted, plug the USB cable from inTOUCH NET into your computer.  Let it load the drivers.  inTOUCH NET is getting its power from the USB connection for this process.
  6. Launch the MPLAB IDE software.
  7. Go to Configure/Select Device.  Select PIC32MX795F512L from the Device drop down menu.  Then hit OK.
  8. Go to Debugger/Select Tool and choose 10 PIC32 Starter Kit.
  9. Go to File/Import and choose the file with the name that ends in .hex.
  10. To go Debugger/Programming/Program All Memories.  It should take about 5 seconds.  You will get a message on the screen that says programming successful.
  11. Go to Debugger/Select Tool and None.
  12. Close the MPLAB IDE software.
  13. Connect to the inTOUCH NET server using the Wi-Fi on your laptop.  Used the SSID and password that came with your kit.
  14. Launch Google Chrome or Firefox.  Internet Explorer will not work for this step.
  15. Navigate to 192.168.1.50/mpfsupload.
  16. Hit the browse button that appears on the screen.  Select the file with the name that ends in .bin.
  17. Press the upload button.  You will get a message on the screen that confirms that the website was loaded to inTOUCH NET.
  18. Unplug inTOUCH NET from the USB port on your computer.
  19. Connect inTOUCH NET to the Infinitybox system.  Shut down all power and start up again.  Wait 30 seconds for the server to initialize.
  20. Connect to the inTOUCH NET network with your smart device.
  21. Browse to 192.168.1.50.
  22. The initial password to get past security is 123 [ENTER].

Your system is now updated with your new code.

If you have any questions with these steps, give our team a call at (847) 232-1991 or email us at sales@infinitybox.com.  You can also contact our team directly by clicking this link.