
Wiring the IDIDIT idTOUCH
This blog post is going to show you how to wire the IDIDIT id.TOUCH PKE system to the Infinitybox 20-Circuit Kit. The Infinitybox system is the electrical backbone for your restoration, resto-mod, street rod, kit car, or Pro-Touring build. Our system is flexible enough to connect and power any external electrical accessory that you want to add. In the case of wiring the IDIDIT id.TOUCH, your 20-Circuit Kit is already powering your ignition, starter solenoid and accessories. You are going to use the id.TOUCH as the switches that connect to the MASTERCELL to control these functions. Keep reading to learn more.
Before we go to far, please carefully read and understand all of the instructions that came with your IDIDIT id.TOUCH system. You can access the manual from the IDIDIT website by clicking this link. This blog post is only going to cover the wiring and connections related to the Infinitybox system. Please follow their instructions for the complete wiring.
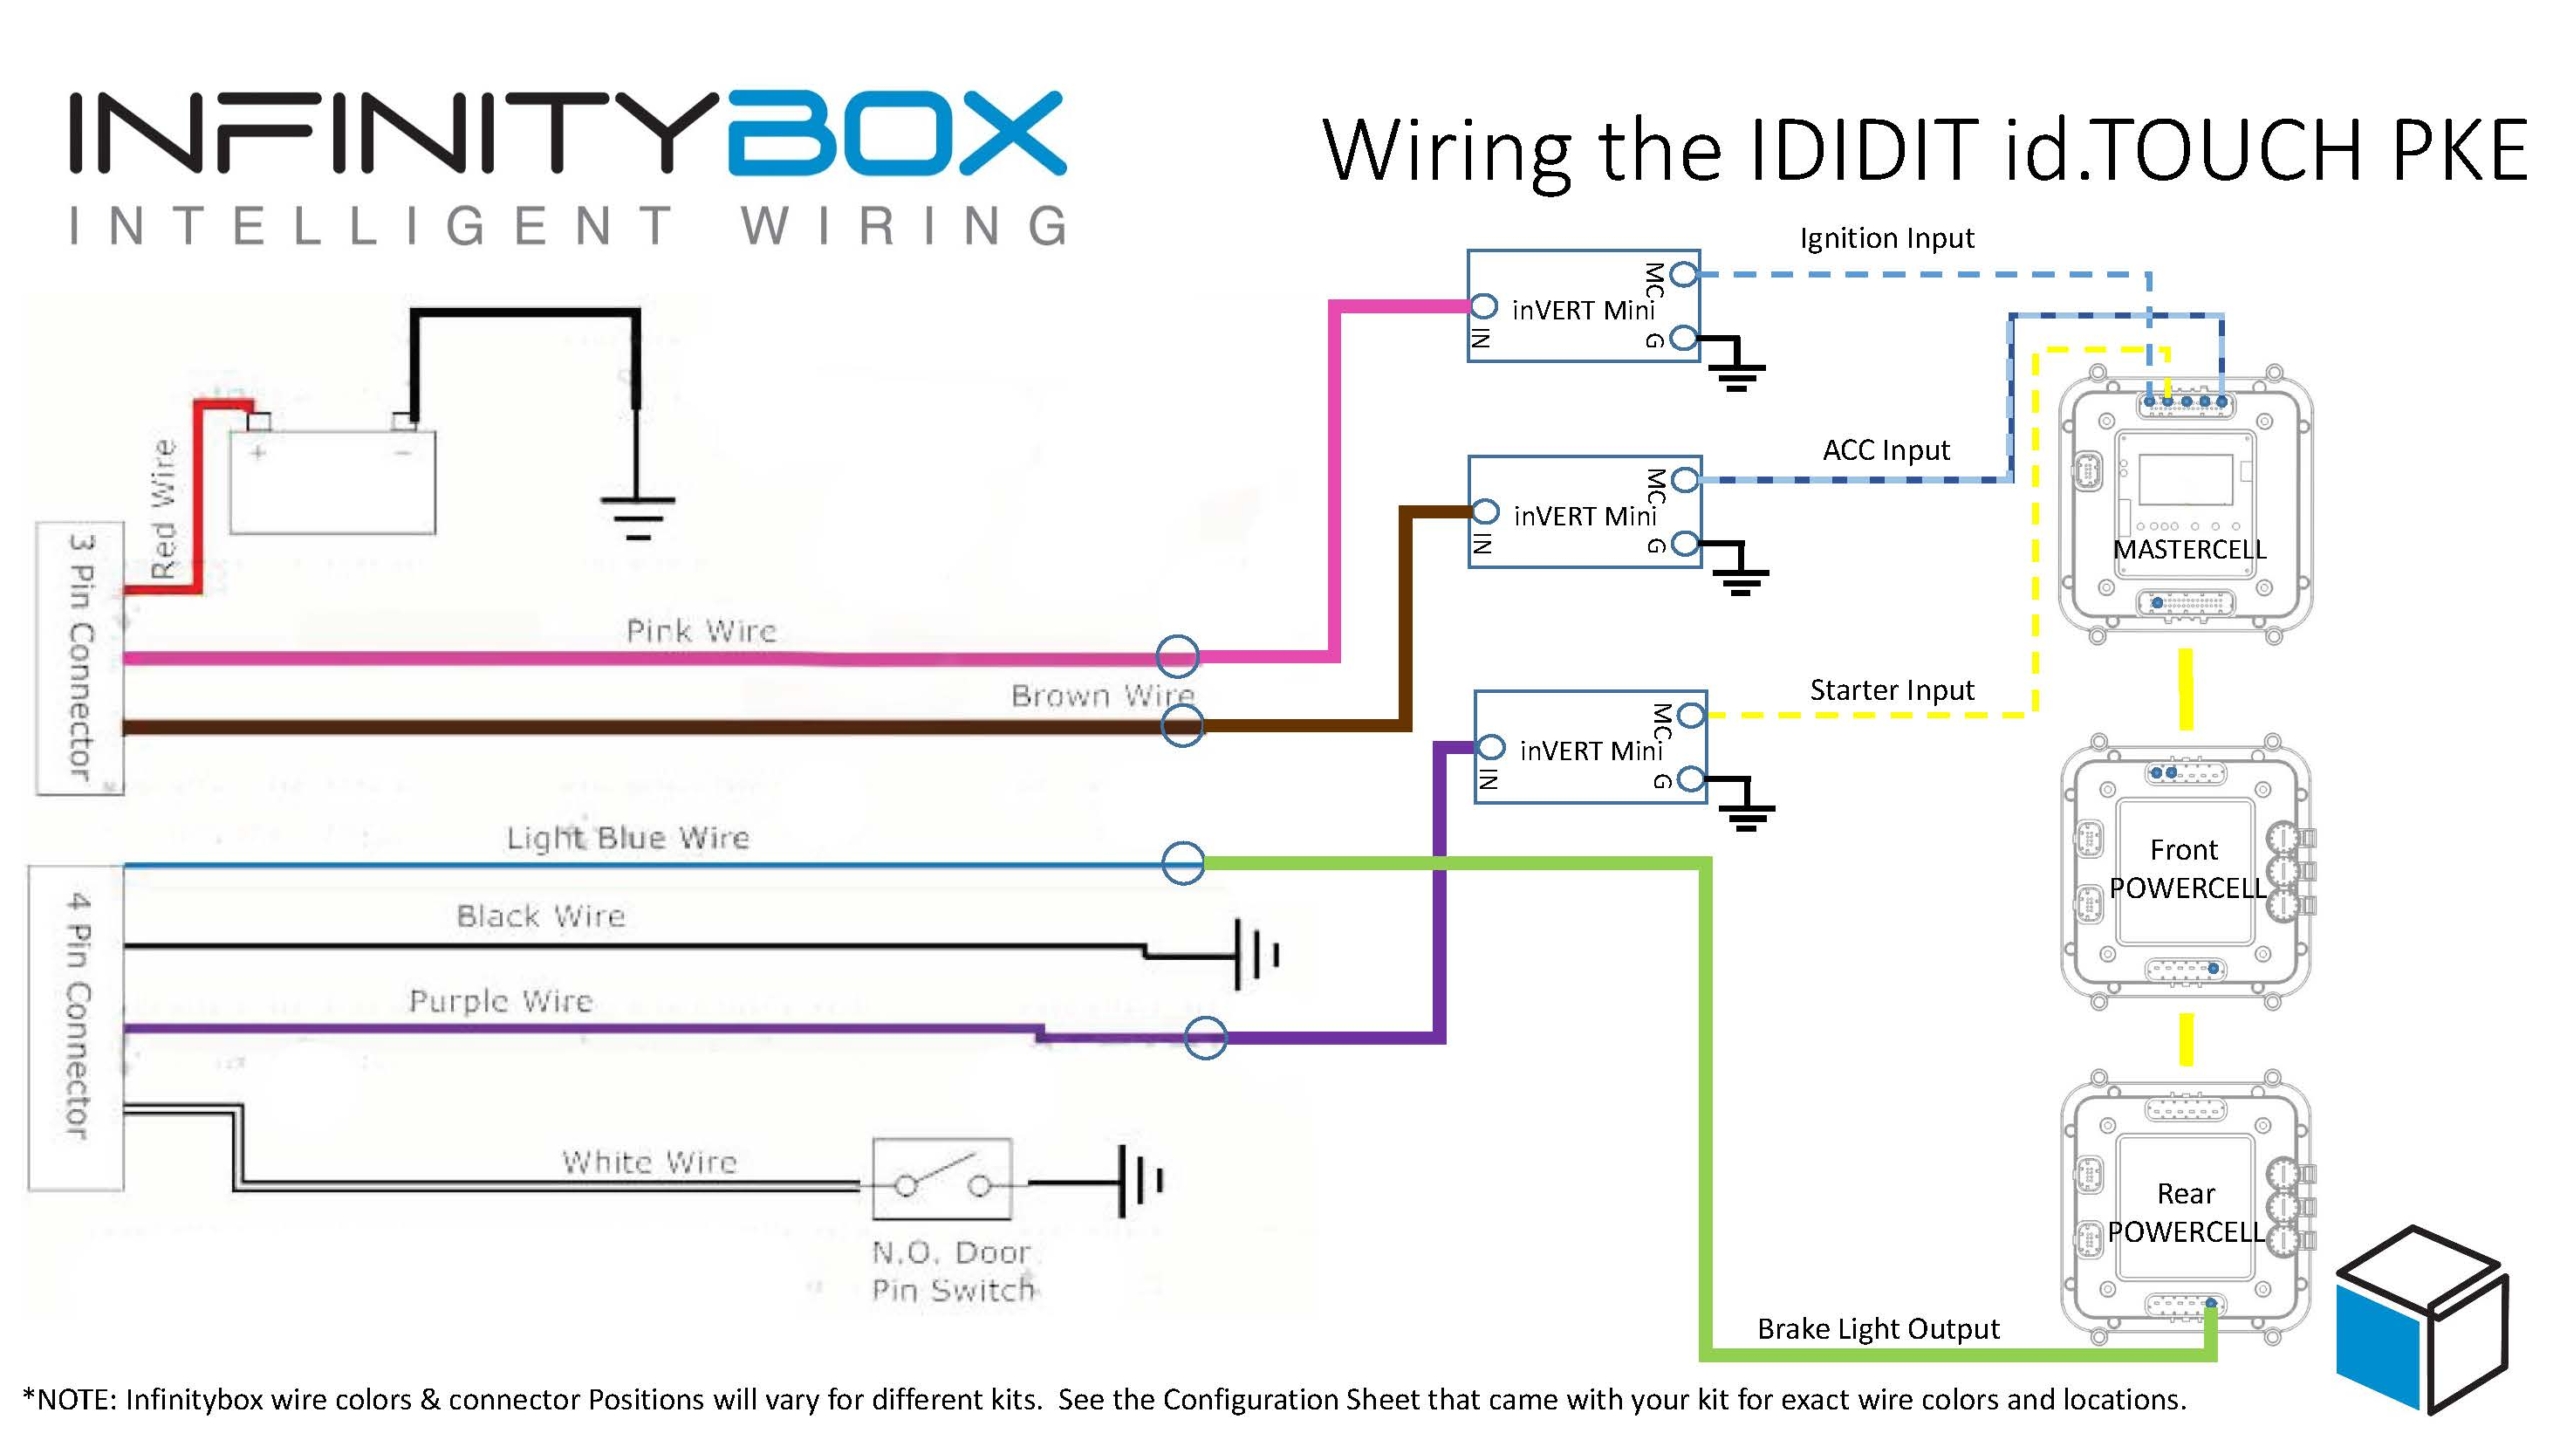
Wiring the IDIDIT id.TOUCH to the Infinitybox 20-Circuit Kit is pretty easy. To the MASTERCELL, the id.TOUCH is just going to look like any ignition & starter switch. This wiring diagram shows the details.

Picture of the wiring diagram showing the optional outputs from the IDIDIT id.TOUCH and the Infinitybox system
The connections that you are concerned about are the id.TOUCH outputs for the ignition, starter solenoid and the accessories. You also need to wire the id.TOUCH input for the brake pedal signal.
For the id.TOUCH outputs for the ignition, starter solenoid and accessories, these are positive 12-volt signals. Our MASTERCELL needs ground triggers. Do not wire the outputs from the id.TOUCH directly to the MASTERCELL inputs. This can potentially damage the MASTERCELL and will void your warranty. You need to either use a small relay to invert these signals or use our inVERT Minis. The wiring diagram shows the correct wiring of the inVERT Mini.
Check the configuration sheet that came with your Infinitybox 20-Circuit for the correct wire colors for the inputs and outputs mentioned in this blog post. You can learn more about the configuration sheet at this link.
The diagram from IDIDIT shows a neutral safety switch on the purple wire going to the starter solenoid. You do not need to wire this with the Infinitybox system. There is a separate neutral safety input that goes to the MASTERCELL. See this link for more details.
The id.TOUCH has an accessory output wire on it. That can be wired to the MASTERCELL to control any of the OPEN outputs on the system. This can be used to control an output separate from the ignition to power your stereo or anything else that you want separate from the ignition.
You also need to connect the POWERCELL brake light output to the brake pedal input on the id.TOUCH. The id.TOUCH needs a positive 12-volt signal to know that you foot is on the brake pedal.
Once you have the ignition, starter solenoid and accessories controlled by your IDIDIT id.TOUCH, you can add more optional features. The id.TOUCH has a set of relays built in that can be used to control optional functions in the car. For example, you could add a trunk popper. Or you could control your door locks if you have our inMOTION cell as part of your Infinitybox system. See the id.TOUCH manual for more details about setting this up. This diagram shows how to wire the optional functions on the id.TOUCH to your MASTERCELL inputs.
Picture of the wiring diagram showing the PKE outputs from the IDIDIT id.TOUCH and the Infinitybox system
The optional control relays on the id.TOUCH are not connected to power or ground, which makes wiring them very easy. You simply need to ground the Green, Blue and Black/Wires in the optional harness. The MASTERCELL inputs for lock and unlock on inMOTION would connect to the Green/Black and Blue/Black wires, respectively. Any additional MASTERCELL inputs for accessories would connect to the Yellow and Orange wires.
The combination of the Infinitybox 20-Circuit Kit and the IDIDIT id.TOUCH gives you modern functionality in your restoration, restomod, street rod, kit car or Pro-Touring build. You can download a PDF of these wiring diagrams by clicking this link.


 Copyright Infinitybox, LLC 2021. All Rights Reserved.

 Copyright Infinitybox, LLC 2021. All Rights Reserved.
  Copyright Infinitybox, LLC 2021. All Rights Reserved.
  Copyright Infinitybox, LLC 2021. All Rights Reserved.
  Copyright Infinitybox, LLC 2021. All Rights Reserved.


 Copyright Infinitybox, LLC 2021. All Rights Reserved.
 Copyright Infinitybox, LLC 2021. All Rights Reserved.


 Copyright Infinitybox, LLC 2021. All Rights Reserved.