Posts

inTOUCH NET Compatible Head Units

Our Infinitybox inTOUCH NET lets you control your car or truck’s electrical system from any smart device.  This includes smart phones and tablets. This link will take you to an overview of inTOUCH NET and a video that describes how it works.  You can go beyond iPhones, iPads, Android Phones and other tablets and connect to inTOUCH NET with a select series of head units.  There are three criteria that you need in a head unit to connect to inTOUCH NET.  First, it needs to have a touch screen.  Second it needs to have a browser built in.  Lastly, it needs to have WiFi.  The connection between the smart device and inTOUCH NET is through a local Wi-Fi connection.  There is no need for data plans or Internet access.  We just a local WiFi connection to get a fast, reliable and secure pipeline for inTOUCH NET.  This post will get you a list of inTOUCH NET compatible head units.

The following list has head units that we have tested with inTOUCH NET.  We have also used customer feedback on these units in the field.  This is an ever changing list as manufacturers add features to their products.  Keep watching this page for updates.

List of inTOUCH NET Compatible Head Units.

  1. Kenwood DNN992
  2. Joying 7-Inch Universal 2DIN
  3. Joying 10-Inch Universal 2DIN
  4. Smarty-Trend 2DIN Universal 7 & 10.1-inch

We will be continually updating this list as new head units make it on the market and we test them.  Please contact us if you have questions about whether or not a specific head unit is compatible with inTOUCH NET.  Also, contact our technical support team with any questions about how you connect your smart device or head unit to the Infinitybox inTOUCH NET.  You can contact our team by clicking this link.

Change inTOUCH NET Password

Our inTOUCH NET accessory lets you control your car from any smart phone or tablet.  You get complete control of your car from the phone in your pocket or a tablet mounted on your dash.  inTOUCH NET has two layers of security.  The first is the password that your device needs to pair to the inTOUCH NET Wi-Fi network.  We’ve blogged before about how to securely pair your smart device to inTOUCH NET.  This link will take you to a blog post and video that goes through the details.  The second level of security is the password that you need to type into your smart device to unlock the system with inTOUCH NET.  This blog post will show you how to change your inTOUCH NET password.

Your inTOUCH NET came with a configuration sheet that listed the name of your specific module, the Wi-Fi password and the default password.  This process is going to let you change that default password.  You will need this configuration sheet to make this change.

You must use a smart phone or a tablet to change your inTOUCH NET password.  This process will not work from a computer or laptop.

The first step is to get to the Settings page for inTOUCH NET.  Click on the Infinitybox logo in the upper right corner.  This picture will show you where this is.

First step in process to change Infinitybox inTOUCH NET Password

First step in process to change Infinitybox inTOUCH NET Password

Once you’re in Settings, you need to click on the Security box.  This picture will show where the Security settings button is.

Second step in process to change Infinitybox inTOUCH NET Password

Second step in process to change Infinitybox inTOUCH NET Password

Next, tap on the white text box under CURRENT Password.  See this picture.

Third step in process to change Infinitybox inTOUCH NET Password

Third step in process to change Infinitybox inTOUCH NET Password

Enter your current password.  If you have not changed the password, use the default password listed on the configuration sheet that came with your inTOUCH NET.  If you have changed your password, use that.  Once you enter the current password, press the Accept button on the screen as shown in this picture.

Fourth step in process to change Infinitybox inTOUCH NET Password

Fourth step in process to change Infinitybox inTOUCH NET Password

Next, tap the white text box in the middle of the screen under NEW as shown in this picture.

Fifth step in process to change Infinitybox inTOUCH NET Password

Fifth step in process to change Infinitybox inTOUCH NET Password

Type in a new password for your inTOUCH NET.  It must be all numbers and can be up to 8 numbers long.  Once you typed in the new password, press the Accept button as shown in this picture.

Sixth step in process to change Infinitybox inTOUCH NET Password

Sixth step in process to change Infinitybox inTOUCH NET Password

Next, you need to confirm the new password.  Touch the white text box on the right, under where it says NEW as shown in this picture.

Seventh step in process to change Infinitybox inTOUCH NET Password

Seventh step in process to change Infinitybox inTOUCH NET Password

Type in your new password.  It must match the password that you created in the previous step.  Once you have typed in the new password, touch the Accept button as shown in this picture.

Sixth step in process to change Infinitybox inTOUCH NET Password

Sixth step in process to change Infinitybox inTOUCH NET Password

The last step to change your inTOUCH NET password is to hit the Apply Changed Password button as shown in this picture.

Eighth step in process to change Infinitybox inTOUCH NET Password

Eighth step in process to change Infinitybox inTOUCH NET Password

You will get a confirmation message like the one shown in this picture.  Touch the blue X in the upper right corner of the message box to close it.

Last step in process to change Infinitybox inTOUCH NET Password

Last step in process to change Infinitybox inTOUCH NET Password

Now you can touch any of the tabs at the top of the screen to get out of the inTOUCH NET Settings and get back to your normal car functions.

Changing your inTOUCH NET password is quick, simple and secure.  Click on this link to contact our team if you have any questions about these instructions.

Picture of a Raspberry Pi 4. This can be used to interface a touch screen into the Infinitybox inTOUCH NET

Options for Touch Screen Control

When we introduced our inTOUCH NET product in 2013, it gave our customers a very simple way to use a smart device to control all of the electrical functions in their hot rods, street rods, resto mods, kit cars and Pro-Touring builds.  Any smart phone or tablet seamlessly connects with inTOUCH NET to give you touch screen control of your lighting, ignition, starter, locks, windows, accessories and your heating & air conditioning controls.  inTOUCH NET is very flexible.  It can connect with any device that has a touch screen, a browser and Wi-Fi.  You can learn more about how inTOUCH NET works by clicking this link.  This blog post is going to go through other options for touch screen control of your car’s electrical system using our inTOUCH NET.  There is a very detailed video below that walks you through the process step by step.

This option uses a Raspberry Pi and a HMDI touch screen.  Both of these parts are easy to get, simple to set up and give you great flexibility.  The Raspberry Pi is small and simple to hide behind your dash.  You have tons of options for different sizes of touch screens and they are all easy to mount in a dash.

The Raspberry Pi is easy to get.  You can buy these directly from their website by clicking this link.  You can also get them from other on-line sources like Amazon.  Be sure to get the Raspberry Pi 4 because this is the version that has Wi-Fi built into it.  There are multiple memory size options for the Raspberry Pi.  For this project, you can use the smallest 2Gb option.

Next, you need a screen to mate with the Rasbperry Pi.  If you search Amazon for “Raspberry Pi touchscreen”, you’ll get a ton of options ranging from 4.3″ to 12″ diagonal screens.  You can pick the size that fits your dash.  You need to find a screen that has HDMI and USB.  The Raspberry is going to send out the video signal over HDMI.  The touch signals and the power for the screen will come from the USB connection.  This link will take you to the screen that we used in the video below.

Lastly, you will need a micro-SD card to hold the operating system for the Raspberry Pi.  Anything larger that 2Gb will work.  This link will take you to the card that we used in the video below.

This video walks through the steps to set this up.

First, you need to connect the Raspberry Pi to the touch screen.  There are two connections: the HDMI cable for video and the USB cable for power and touch screen commands.  You also need to get power to the Raspberry Pi.  That comes in through a USB C cable.  You need to get a place behind your dash to plug in the USB C cable.  A USB port like this one will convert your car’s battery voltage to the required 5-volts for the USB cable.

Next, you need to load the Raspian operating system on the Micro-SD card.  The video goes through that in detail.  This link will take you to the place to download Raspian.

Lastly, you need to connect the Raspberry Pi to the Wi-Fi broadcast by the inTOUCH NET.  The video below goes through the details but you can also watch this video to learn more about the process.

Check out the full set up video here.


Once you’ve gone through these steps, you have a touch screen interface that you can mount in your dash to control your entire electrical system through the Infinitybox inTOUCH NET.  This shows you the options for touch screen control with the Infinitybox system.

Click on this link to contact our technical support team with any questions.  

1955 Chevy Bel Air wired with the Infinitybox System

1955 Chevy Bel Air- Great 8 Winner

Our Infinitybox team is thrilled to be a part of Bob Matranga’s 1955 Chevy Bel Air.  This car was awarded as one of the Great 8 winners for the 2020 Ridler Award at the Detroit Autorama.  The car is appropriately named Brute Force.

1955 Chevy Bel Air wired with the Infinitybox System

1955 Chevy Bel Air wired with the Infinitybox System

Bob and his team built a stunning 1955 Chevy Bel Air.  You could spend hours looking at all of the details in this car.  From the engine, to the chassis, to the one-off lights, to the leather treatment to the emblems, this is an impressive car.

1955 Chevy Bel Air wired with the Infinitybox System

1955 Chevy Bel Air wired with the Infinitybox System

1955 Chevy Bel Air wired with the Infinitybox System

1955 Chevy Bel Air wired with the Infinitybox System

1955 Chevy Bel Air wired with the Infinitybox System

1955 Chevy Bel Air wired with the Infinitybox System

You can see an interview with Bob going through the details of the car here.  Thanks to EClassic Autos for the video content.

1955 Chevy Bel Air: Great 8 Winner at 2020 Detroit Autorama from eclassicautos on Vimeo.

Bob’s team started with our Infinitybox 20-Circuit Kit to wire the car.  From there, they added inMOTION to control their power locks and power windows.  They added inLINK for remote control from a key fob.  inRESERVE for active battery management.  inTOUCH NET so they can control the car from a tablet or smart phone.  And inVIRONMENT so they can control their Vintage Air Gen-IV from their touch screen.  They have the cells strategically located in the car to optimize the wiring harness and get them the most features.

We had a chance to talk to Chris Brown of Brown Auto Design at the Autorama.  Chris is the mastermind behind the design of this car.  He mentioned to us that he had very limited room to run wires in the car.  Using the Infinitybox system made wiring the car much easier for him and his team.

1955 Chevy Bel Air wired with the Infinitybox System

1955 Chevy Bel Air wired with the Infinitybox System

We are very proud to be a part of this project.  Congratulations to Bob and the entire team at Matranga Hot Rods for making it to the Great 8.

Click on this link to contact our team to learn more about wiring your car with our Infinitybox system.

1955 Chevy Bel Air wired with the Infinitybox System

1955 Chevy Bel Air wired with the Infinitybox System

Setting Up inTOUCH NET

inTOUCH NET

inTOUCH NET

This blog post is going to show you how you connect your smart device to the Infinitybox inTOUCH NET module.  We just published a video showing the details which can be seen below.  This video also demonstrates the standard screens that you get with inTOUCH NET.

You can get more details on inTOUCH NET and its capabilities by clicking this link.  You can also download the installation manual for inTOUCH NET by clicking this link.

Your smart phone or tablet communicates with inTOUCH NET using Wi-Fi.  This is a local connection.  You are not going to the Internet or the Cloud.  There is no subscription or data plan required.  We just use Wi-Fi as the pipeline to pass data between your smart device and inTOUCH NET.  Connecting to inTOUCH NET is just like connecting your smart device to your home of office Wi-Fi network.  It is a simple process and is very secure.

Before you make the connection, you need to connect your inTOUCH NET module to the CAN cable of your Infinitybox 20-Circuit Kit.  Please follow the instructions in the inTOUCH NET manual.

Once you have the inTOUCH NET module spliced into the CAN cable of your 20-Circuit Kit, you need to power up the Infinitybox system.  You also need to have your smart device in range of the car.  Any closer than 20 feed would be fine for this process.

Here are the steps to pair your smart device to inTOUCH NET.

  1. Go to the SETTINGS for your smart phone or tablet.
  2. Search for Wi-Fi networks.
  3. Find the network name (SSID) being broadcast from your inTOUCH NET.  It will be in the form of inTOUCH_XXX.   The XXX represents the specific numbers for your inTOUCH NET.  These will be printed on the configuration sheet that came with your inTOUCH NET.
  4. Connect to inTOUCH_XXX.  You will be asked for the password.  This is the 10 digit Module Password printed on your inTOUCH NET Configuration Sheet.  This is unique to your inTOUCH NET module.
  5. Open a browser on your smart device.  Any browser will work including Google Chrome, Internet Explorer, Safari and Firefox.  Type the IP address for your module into the address bar of your browser.  This is 192.168.1.50.
  6. When the Security window appears, enter the default password that is printed in your inTOUCH NET Configuration Sheet.

This video will go through these steps in more detail.

Once this is done, you can control your entire Infinitybox electrical system from your phone or tablet.

Click on this link if you have any additional questions about connecting your smart device to inTOUCH NET.

inTOUCH NET Introduction Video

Our Infinitybox system is the most powerful and flexible electrical system on the market.  It can be used to wire any restoration, resto-mod, hot rod, street rod, kit car or Pro-Touring build.  Over the entire range of our products and accessories, you can get complete control of the electrical system in your car.  Our inTOUCH NET product gives you a whole new level of control.  With inTOUCH NET, can control all of the features of your car from a smart phone or a tablet.  The following inTOUCH NET Introduction Video walks through the highlights of what inTOUCH NET can do.

Scott Roth and his team at The Auto Shoppe in Vermont built an amazing 1967 Corvette with our inTOUCH NET.  inTOUCH NET controls all of the functions of the car.  We shot this video with Scott and the car to show off how inTOUCH NET works and what it can do.  Check out inTOUCH NET in action here.

Click on this link to contact our technical support team to learn more about inTOUCH NET and how you can control your car or truck from any smart device.

inVIRONMENT Video

Our Infinitybox system offers you the broadest level of electrical control for your hot-rod, street rod, resto mod, kit car, component car and Pro-Touring build. No other wiring harness can do what the Infinitybox system can do. One of our most popular accessories is inVIRONMENT.

Our inVIRONMENT module is a revolutionary connection between your Infinitybox system and a Gen IV climate control system from Vintage Air. Using our inTOUCH NET and inVIRONMENT, you can completely control your heating and air conditioning from a smart phone or tablet in your car. You can control the blower fan speed, the temperature and the blend from a simple and intuitive touch screen interface. You can learn more about the inVIRONMENT module by clicking this link.

This video will show you the features of the inVIRONMENT module.

Click on this link to contact our technical support team with any questions.

1966 Mustang wired with the Infinitybox System

iPhone Controls this 1966 Mustang

Our customers are technology guys. They like to tinker, create and modify things. They aren’t content with things that are basic. We have been helping our customers build beyond basic cars for 10 years now. This one is no exception. Geoff Beale built a beautiful 1966 Mustang hardtop that was featured in the most recent issue of Mustang Monthly. Geoff did something very unique with the electrical system in this car. He wired it with our Infinitybox system, then paired our system with a Crestron control system. The end product is an awesome Mustang with complete control through switches and an iPhone. Read below for more details.

Geoff runs Throwback Customs. In addition to that, he is highly involved with Crestron, which builds electronic control systems for conference rooms, board rooms and schools. Geoff paired his Crestron expertise with our Infinitybox system to get a powerful electrical system for his Mustang.

The car was in pretty rough shape when Geoff purchased it. Over several years, he has shaped, sculpted and created his ideal version of the 1966 Mustang. He installed a supercharged 5 liter Coyote Mustang engine on an Art Morrison MAXG chassis. From there, he has added subtle touches to the car that you won’t see anywhere else.

1966 Mustang wired with the Infinitybox System

1966 Mustang wired with the Infinitybox System

When it came to wiring the car, he came to Infinitybox to get our 20-Circuit Kit to be used as the main body controller. This kit is powering his lighting, ignition, starter, cooling fans, fuel pump, horn and other accessories. He added an extra POWERCELL to get 10 more outputs for the added features that he has in the car. He then added our inMOTION Motor Controller to control his power windows and locks. Lastly, he added our inVIRONMENT module to control his Gen-IV unit from Vintage Air.

Because of his experience with Crestron, he wanted to use their system as the touch screen and iPhone controller for the car. Our MASTERCELL inputs are all ground switched so Geoff was able to easily connect his inputs to the outputs of his Crestron controller. All the electrical features in the car can be controlled through the Crestron touch screen or the Crestron iPhone app. Geoff has a YouTube channel full of videos showing off the integration of the two systems. Here’s an example video of him showing off the electrical features in the car.

Geoff Beale testing the Infinitybox system in his 1966 Mustang Hardtop.

This video shows off the Crestron touch screen system that he paired with our Infinitybox system.

Geoff Beale showing off the Crestron touch screen paired with his Infinitybox system in his 1966 Mustang Hardtop.

This video shows off his inVIRONMENT module in the car and how it works with his touch screen.

Controlling a Gen-IV from Vintage Air with inVIRONMENT and the Infinitybox system.

Jesse Kiser of Mustang Monthly shot a bunch a great pictures of the car. He also wrote a great article covering the history of the car, Geoff’s build and the unique features of this Mustang. You can read the entire article by clicking this link.

Congratulations to Geoff for finishing a spectacular build. We’re proud to be a part of this car.

Click this link if you want to learn how our Infinitybox system can help you wire your next restoration project.

1966 Mustang wired with the Infinitybox System

1966 Mustang wired with the Infinitybox System

Updating inTOUCH NET with SKII Boards

All of the Infinitybox hardware can be updated in the field.  Some of these changes require our inCODE programmer.  Some can be done directly from a laptop.  Updating inTOUCH NET can be done directly from a laptop with Wi-Fi.

PLEASE NOTE: YOU WILL ONLY HAVE TO GO THROUGH THESE STEPS IF YOU ARE DIRECTED TO DO SO BY AN INFINITYBOX TECHNICAL SUPPORT REPRESENTATIVE!

There are two different versions of our inTOUCH NET.  As of January 2017, we moved to the SKII version of our board.  If you have an inTOUCH NET from before this date, see this blog post for the updating instructions.

You will receive an email from Infinitybox with the files that you need to load onto your inTOUCH NET.  Read through these steps carefully before proceeding.  Before starting, these steps must be done on a Windows PC or Laptop with Wi-Fi capability.

  1. You will receive an email from Infinitybox technical support with the updated files that are specific to your inTOUCH NET.  Download these files and save them to a convenient location on your computer.
  2. Disconnect inTOUCH NET from your Infinitybox system.
  3. Download http://www.microchip.com/mplabx-ide-windows-installer on your computer.
  4. After the download is complete, run the installer. When prompted, only install MPLAB IPE, uncheck the box for MPLAB X IDE.
  5. After MPLAB IPE is successfully installed, reboot your computer.
  6. After the computer is rebooted, plug the USB cable from inTOUCH NET into your computer. Let it load the drivers.  inTOUCH NET is getting its power from the USB connection for this process.
  7. Launch the MPLAB IPE software, which can found under Microchip/MPLAB X IDE in the start menu or use the MPLAB IPE shortcut on the desktop.
  8. In the Device drop down menu, select PIC32MX795F512L. Click on the Apply button.
  9. In the Tool drop down menu select PKOB SKDE if not selected already.
  10. Click on the Connect button.
  11. Click browse at the end of the source line and choose the file with the name that ends in .hex.  This would be the file that we emailed to you.
  12. Click program, the output window should indicate “Programing Complete” when finished.
  13. Close the MPLAB IPE software.
  14. Connect to the inTOUCH NET server using the Wi-Fi on your laptop.
  15. Use the SSID and password that came with your kit.
  16. Launch Google Chrome or Firefox. Internet Explorer will not work for this step.
  17. Navigate to 192.168.1.50/mpfsupload.
  18. Hit the browse button that appears on the screen. Select the file with the name that ends in .bin.
  19. Press the upload button. You will get a message on the screen that confirms that the website was loaded to inTOUCH NET.
  20. Unplug inTOUCH NET from the USB port on your computer.
  21. Connect inTOUCH NET to the Infinitybox system. Shut down all power and start up again. Wait 30 seconds for the server to initialize.
  22. Connect to the inTOUCH NET network with your smart device.
  23. Browse to 192.168.1.50.
  24. The initial password to get past security is 123 [ENTER].

Your system is now updated with your new code.

If you have any questions with these steps, give our team a call at (847) 232-1991 or email us at sales@infinitybox.com.  You can also contact our team directly by clicking this link.  

Picture of the Apple iPhone and iPad

inTOUCH NET Apple Wi-Fi Data Setup

Our inTOUCH NET changed the industry when we introduced it in 2013.  For the first time, practically anyone could wire their cars and get modern touch screen control from any smart phone or tablet.  inTOUCH NET is unique because it uses Wi-Fi to communicate between your smart device and our Infinitybox system.  This eliminates a lot of wire and lets you control you car remotely to unlock doors, control lights and roll down windows.  A lot of people have asked how to properly connect their iPhone to inTOUCH NET so they have control of the car plus access to their cellular data.  This blog post will get you those details.  Please note that this blog post only describes how to set up an Apple iPhone or an iPad (standard or Mini) with a cellular data plan.  Keep watching this space for instructions showing you how to do this for Android phones and tablets.

inTOUCH NET uses a secure Wi-Fi connection as the method to communicate between your smart device and your car.  In a lot of cases, our customers want to use the cellular data on their iPhones or iPads for navigation, audio streaming or surfing the Internet when they are in their cars.  These steps will show you how set up your iPhone or iPad so you can maintain access to your cellular data and be connected to inTOUCH NET.

These instructions assume that you are setting up your inTOUCH NET for the first time.  Skip to STEP 5 if you have already connected your iPhone or iPad to inTOUCH NET.

STEP 1: Touch the Settings Icon.

Apple Settings Logo

Apple Settings Logo

STEP 2: Touch Wi-Fi Settings

Step 1 of connecting the Infinitybox inTOUCH NET Module to your Apple Device

Step 1 of connecting the Infinitybox inTOUCH NET Module to your Apple Device

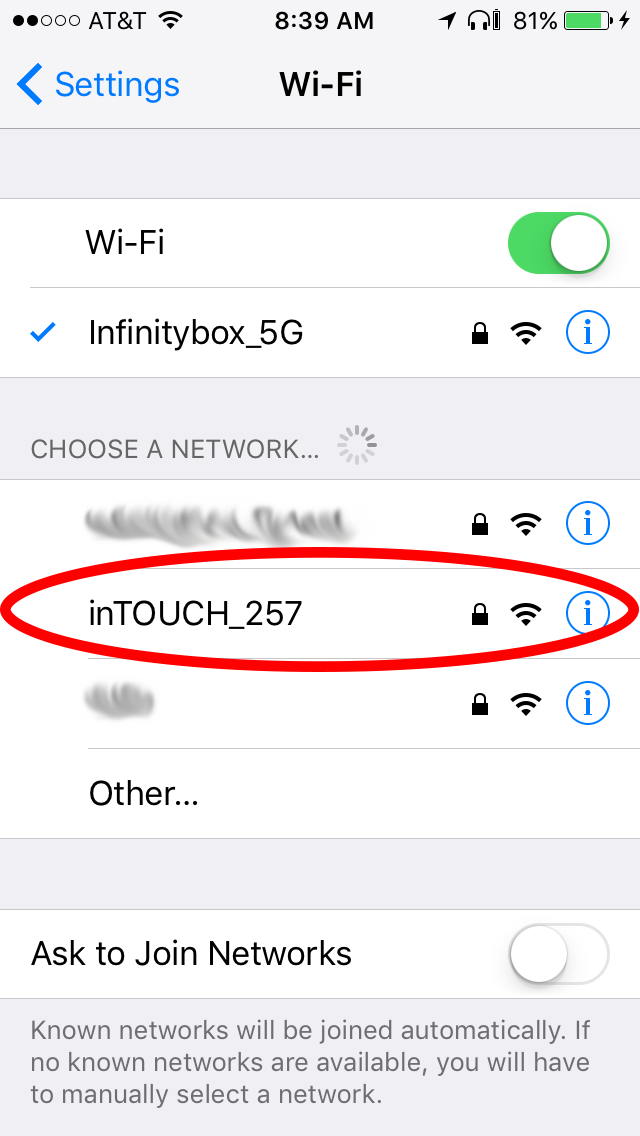
STEP 3: Touch your inTOUCH NET SSID

Each inTOUCH NET broadcasts its own unique network name.  For these instructions the inTOUCH NET that we are using will be inTOUCH_257.  Yours will be different so check the configuration sheet that came with your inTOUCH NET.  Make sure that your Infinitybox system is properly connected and powered up.  It may take up to 1 minute after the system is powered up before the inTOUCH NET network name shows up.

Step 2 of connecting the Infinitybox inTOUCH NET Module to your Apple Device

Step 2 of connecting the Infinitybox inTOUCH NET Module to your Apple Device

STEP 4: Enter your inTOUCH NET Password.

The configuration sheet that came with your inTOUCH NET will have a unique password that lets you connect your smart devices to the network.  Type in this password.  After you complete this, press Join in the upper right corner of the screen.

Step 3 of connecting the Infinitybox inTOUCH NET Module to your Apple Device

Step 3 of connecting the Infinitybox inTOUCH NET Module to your Apple Device

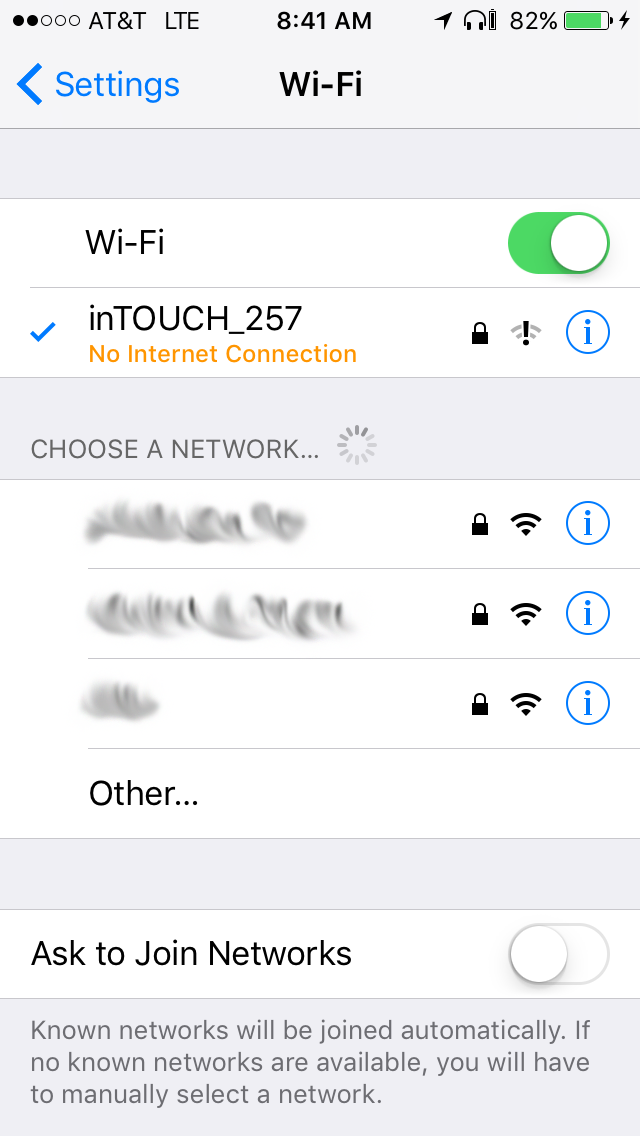
STEP 5: Hit the Information icon to the right of the inTOUCH NET Network Name

Wait until you see the inTOUCH NET network name appear at the top of the screen with a check mark next to it.  It may take up to 30 seconds for this happen after you successfully enter your password.

Step 4 of connecting the Infinitybox inTOUCH NET Module to your Apple Device

Step 4 of connecting the Infinitybox inTOUCH NET Module to your Apple Device

STEP 6: Get the Network Information for your inTOUCH NET

Write down the IP Address and the Subnet Mask shown on the screen.  These will be unique to your inTOUCH NET and may not be the same as numbers shown in the picture below.  Once you have written this down, press the Static button as shown in this picture.

Step 5 of connecting the Infinitybox inTOUCH NET Module to your Apple Device

Step 5 of connecting the Infinitybox inTOUCH NET Module to your Apple Device

STEP 7: Enter the Static IP Address Details

Type in the IP Address and Subnet Mask numbers that you wrote down in Step 6.  Leave all of the values below Subnet Mask blank.  Do not enter any information into these fields.  When you are done, touch <Wi-Fi in the upper left corner.

Step 6 of connecting the Infinitybox inTOUCH NET Module to your Apple Device

Step 6 of connecting the Infinitybox inTOUCH NET Module to your Apple Device

When you have completed these steps, your Wi-Fi settings will look like this.

Step 7 of connecting the Infinitybox inTOUCH NET Module to your Apple Device

Step 7 of connecting the Infinitybox inTOUCH NET Module to your Apple Device

You will see a message that says that there is No Internet Connection for inTOUCH NET.  Since inTOUCH NET is a local connection, there is no Internet connectivity.  That is absolutely normal.  You will see an exclamation mark over the Wi-Fi symbol between the lock icon and the blue information icon.  This is also normal.

These simple steps will allow you to connect your iPhone or iPad with a cellular data plan to inTOUCH NET so that you can control your car and access your cellular data at the same time.

Please click on this link if you have any additional questions about these instructions.